Casting Organics in 13 Simple Steps
Many people want to know how I turn flowers and leaves into sterling silver jewelry. Most of their eyes start to glaze over, however, as I try to explain the process. So here below I have broken it down into 13 easy steps (I also have a bridge for sale …). If illustrated instructions work for you, enjoy. If they don’t, just pretend I can do magic and change organic materials into metal.
1) Take your pick
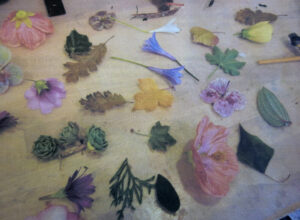
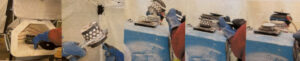
My canine assistant Jake and I take a walk around the neighborhood and pick leaves and flowers with interesting textures and forms. Castings usually turn out better if the items are fresh, but sometimes older dried leaves pack a wallop of great textures.
2) Fatten it up
In order to cast fully, items need to be at least 1.5mm thick everywhere, especially if they are large and flat like leaves and flower petals. Molten silver cools very quickly when in contact with the edges of your mold so thin items are especially difficult because the silver will start to harden on contact.
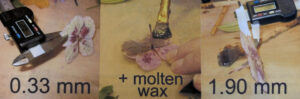
We thicken our items by carefully painting molten wax onto their back sides. Tricky to do, however, as wax too hot will blister and blanche the organic item and wax too cold will goop up and make it too heavy.
3) Create the flow
Now we need to figure out how to get the molten silver into our casting. We need to create channels or “sprues” to direct the flow of the silver into all parts of the leaf or flower. The molten metal will flow down the main channel (the blue wax tube below) and then branch out through the feeding sprues (the red wax rods below) and then to the actual item you are casting. So, while we build up the sprue “tree” in the order below, the flow fo the molten metal is really best understood by looking at the last image that shows the orientation of the tree when we actually pour the metal into it.
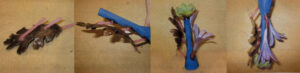
We can put multiple items on the same tree, but need to be careful to think through how the molten metal will flow to make sure that we don’t divert the flow before it fills all the items.
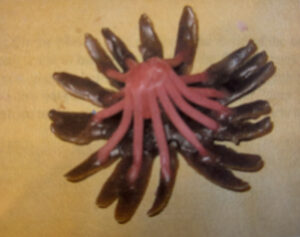
Some items like this daisy are so complicated that they need a LOT of sprues. Each of the petals needs to have its own feeder tube to make sure it gets filled with metal. After assembling our sprues and tree, we paint the whole thing with a special debubbler solution that will prevent air bubbles from attaching to the surface of our castings.
4) Flask it
We now need to place our tree in a container that we can fill with plaster investment. We attach the tree to a rubber base and then place a steel flask on it so that there is at least .25” of clearance around all parts of the tree.
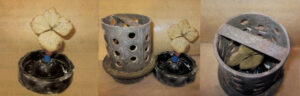
Smart readers will notice that the flask is full of holes and isn’t likely to be able to hold plaster very well. Good catch! My ten-year old son love the job of using a hair dryer to shrink wrap the perforated flask with a plastic sleeve.
5) Invest it
“Investment” is the name used for the plaster used to create the mold of the tree of items you want to cast. It comes in a powder that is very toxic to breathe because of the fine silicates that can tear up your lungs. So the heavy-duty face mask and goggles below are a must. Once you combine the investment with water, you have about 12 minutes to work with it before it starts to harden or “cure.” The time pressure and cumbersome protective equipment makes this one of my least favorite parts of the process.
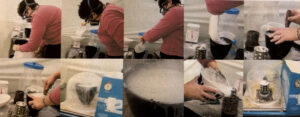
After measuring out the investment powder and water, you mix it by hand until it is about the consistency of sour cream. Then you place it under a bell jar and vacuum it for several minutes to remove the air bubbles and gasses from the water and mixing process. Next you pour it carefully down the side of the flask so that you don’t topple your tree. Finally, you put it back in the vacuum chamber to pull out any bubbles introduced in the pouring process. If you are fast and lucky, you will have done all this in the 12 minutes and have plaster smoothly surrounding your tree. Phew!
After the flask has sat for about two hours, the investment will be solid enough to take off the plastic sheathing and the rubber base. We
6) Burn out the tree
After all that hard work thickening up the flowers, adding multiple sprues, and assembling the tree, it seems a shame to get rid of it, but it has served its purpose. It has forced the investment to create a mold the exact shape of the leaves and flowers we want to cast (plus all the sprues and channels). So, in order for the molten metal to be able to get into these shapes, we need to get rid of all of the wax and the organic matter.
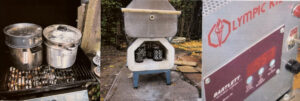
We start by using the backyard barbeque and some old pots from Goodwill to steam out as much of the wax as possible. In about an hour, we will see most of the blue main channel and most of the red sprue channel wax melted at the bottom of the pots. The flasks are hot and need to go directly into the kiln (already heated up to 300 F) so that they don’t suffer thermal shock. They will stay in the kiln at this temperature for several hours to allow all of the steam to leave the investment plaster gracefully (instead of bursting pits in the plaster.)
Over five-six hours, the kiln will heat up to 1350 F – the temperature at which the investment is fully “fired” and reaches its maximum hardness and strength. After six or more hours at this temperature, the kiln will slowly lower to 1200 F – the temperature at which we will pour our molten silver in and actually do the casting. All in all, the steaming and firing process typically runs for 18 hours.
7) Melt some metal!
I use an electromelt furnace to recycle and melt my sterling silver (or gold.) It looks like a large thermos and uses an electrical current to heat metal to over 2000F.
We place the sterling scrap, silverware, old jewelry, etc. in the graphite crucible in the furnace and set it to the 1850F melting point of silver. Once the silver is molten, we stir it carefully with a graphite rod to pick up any impurities in the silver.
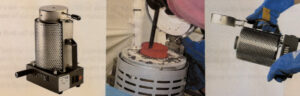
8) FINALLY, we get to the actual casting.
Using tongs and high temperature gloves, we take the flask out of the kiln, turn it so that the hole where the tree used to be is on top, and clean out any little bits of plaster that might fall down the channels and block the molten silver. The flask goes inside a vacuum chamber in the casting machine.
Turn on the vacuum and watch the gage until it hits at least 28. The vacuum will suck out the air that is inside the flask and minimize the resistance that the molten silver will face as it flows into the flask. Perforated flasks allow the suction to work all over the plaster. It essentially helps “suck” the silver down into all of the voids in the plaster.
Next we open the electromelt and pour the molten silver into the mouth of the tree. This is a nerve-wracking step as we have to pour in very smoothly, but quickly, and pray that the metal flows down all the channels we created to fully fill the items we are casting.

We are working relatively blind since all we can see is the top “button” of rapidly cooling silver at the base of our upside-down tree buried inside the hardened investment.
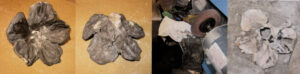
9) Boil off the plaster
When the silver is no longer glowing red, then the investment is ready to come off. We use the tongs and gloves to take the flask to a metal bucket filled with water and slowly glide it through the water. Putting a metal flask at 1000F into the water will super boil it and the resulting froth and force will make the investment melt away from the casting and the flask. This part of the process is very loud and messy (my son’s favorite).

If we are careful to keep the flask angled upwards, then we will end up with our tree that we build out of flowers, leaves and wax channels all turned into one solid sterling tree. It will be black on the surface because of the oxidation that happened when the molten silver was exposed to air.
10) Celebrate (or cry)
After several days of working on the casting, we now can see if it succeeded or not. If we are very, very, VERY luck, the metal tree will look exactly like the original and have all of the items we wanted fully formed. More likely, we will see a combination of items that cast and items that did not cast fully, or at all.
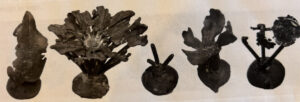
Some of the endless things that could go wrong include: the plant matter did not burn out all the way, a bit of dirt or plaster blocked a sprue channel, the sterling cooled before it could reach your piece, the plaster was too hot or too cold, the sterling didn’t flow smoothly, the kiln didn’t maintain the temperatures you needed at each step, and so on and so forth. About 35% of our castings actually work out and we are continually trying to experiment with variables to try to increase our odds.
11) Cut your pieces off the tree
The major volume and weight of the cast tree is actually the sprue trunk and branches we used to get the metal to the flower or leaf we actually wanted. So now we have to prune our fruit off the tree with large shears or rotary cutting tools.
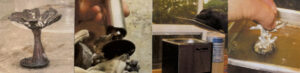
To get all the remaining investment gunk off, we put the castings (and the left-over sprues and trunks that you want to remelt) into an ultrasonic cleaner with some investment removal solution to shake them clean.
12) Put the castings on a diet
The castings will now need to lose weight. We had added wax to the backs to make them thick enough for molten silver to flow into them all over. However, metal is much heavier than wax and the resulting castings are mostly too heavy to wear. We use a variety of grinders to carve away as much of the extra metal on the backs of the flowers and leaves as possible. Flat surfaces are easy to grind away. However, most of the castings have lots of furls, curls, and other three dimensional details that make removing mass from the backs a huge challenge. One piece can take hours of carving work to make thin enough and light enough to wear.
Sometimes we carve away too much by mistake. We will then create a hole, or a section that is too thin. Depending on how “artistic” we want the item to be, we solder on “band aids” of sterling on the backs to try to patch up the holes. Once these are on, we have to go back to the carving process to smoothly integrate the patches onto the back topography of the piece. It is a very fine line between thin enough and too thin and we keep tripping back and forth over it as we work to remove as much metal as possible.
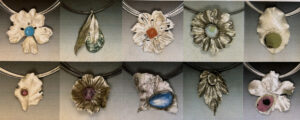
13) Turn them into jewelry
Once they are light-weight and clean, the castings are finally ready to be incorporated into a jewelry creation. The process is long, difficult, and fraught with opportunities to mess up; but the results are worth it! You can find yourself wearing a sterling version of actual flowers and leaves, with all of the natural details, textures, and shapes. We hope this explanation will add to your appreciation of our “Organics IN Nature.”